這裡有一個 UITabBarController + 一個 UITabBar + 兩個 UIViewController,等一下 Selected View (Item 1) 的要加入一般的 View Controller,第二個 View Controller (Item 2) 的要加入 Navigation Controller
3.接著在 MainWindow.xib 的視窗內,點選 Tabs App Delegate,然後按住 Control 不放,接著滑鼠按左鍵移動一下,看到藍色拖曳線就可以把 Control 放看,滑鼠左鍵按著不要放,把拖曳線移到 Tab Bar Controller 之後放開,會出現 Outlets\rootController 的視窗,點選 rootController。
你可以按下 +2 看到 Tabs App Delegate 的 Outlets 內,有一個 rootController 連到 Tab Bar Controller
把 MainWindow.xib 存檔 +S 後,回到 Xcode 開啓 TabsAppDelegate.h 的檔案,把剛剛的 Tab Bar Controller(rootController) Outlet 定義進來
接下來要建立兩個 UIViewController 分別給這兩個標籤項目 Tab Item,一個是基本的 UIViewController,另一個是 UINavigationController
在 Xcode 的 Classes 上面按右鍵選 Add\New File,選 Cocoa Touch Class 的 UIViewController subclass,把 Option 勾選 With XIB for user interface,一併把畫面產生出來
名稱: FirstViewController.m
在 Classes 內會看到 FirstViewController 的 .h .m .xib 三個檔案
我通常會把 .xib 放在 Resources 內
把 FirstViewController.xib 打開編輯,拖曳一個 Lable 進來,內容為【第一頁】
然後存檔,開啓 MainWindow.xib,我們要讓第一個標籤與 FirstViewController 連結。
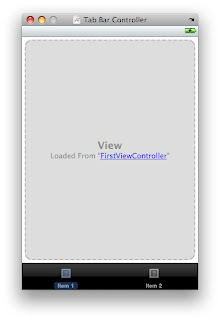
1.點選 Tab Bar Controller 的第一個標籤,按 +4 把 Class 指定 FirstViewController
2.按 +1 把 NIB Name 指定 FirstViewController
然後就可以馬上看到 View 畫面變成這樣:
記得存檔 +S,再回到 Xcode 打開 TabsAppDelegate.m 修改如下:
#import "TabsAppDelegate.h"
@implementation TabsAppDelegate
@synthesize window;
@synthesize rootController;
- (void)applicationDidFinishLaunching:(UIApplication *)application {
// Override point for customization after application launch
[window addSubview:rootController.view];
[window makeKeyAndVisible];
}
- (void)dealloc {
[window release];
[rootController release];
[super dealloc];
}
@end
執行看看,點選標籤1與標籤2,是不是正常切換:
接下來就是重點了,要把 Navigation 設定在標籤2
回到 Xcode 加入一個 UIViewController subclass 取名 MyNavigationController,跟之前 FirstViewController 一樣,不過要把 MyNavigationController.h 的 @interface 繼承自 UIViewController 改成 UINavigationController
#import _UIKit/UIKit.h_
@interface MyNavigationController : UINavigationController {
}
@end
接著開啓 TabsAppDelegate.h 修改如下:
#import _UIKit/UIKit.h_
#import "MyNavigationController.h"
@interface TabsAppDelegate : NSObject {
UIWindow *window;
IBOutlet UITabBarController *rootController;
MyNavigationController *navigationController;
}
@property (nonatomic, retain) IBOutlet UIWindow *window;
@property (nonatomic, retain) IBOutlet UITabBarController *rootController;
@property (nonatomic, retain) MyNavigationController *navigationController;
@end
記得回到 TabsAppDelegate.m 加上
@synthesize navigationController;
還有,Navigation Controller 也要有一個 View Controller,所以繼續加上一個 UIViewController 取名 SecondViewController 的 UIViewController subclass,並建立 SecondViewController.xib
開啓 SecondViewController.xib 修改 View:
存檔 +S 後,開啓 MainWindow.xib
與 FirstViewController 做法一樣,點選標籤2,把 Class 設定 MyNavigationController
接著點選 MainWindow.xib 的 Tab Bar Controller
按 +1 把 Title "第二頁" 的 Class 改成 "Navigation Controller"
再來把 MainWindow.xib 的 Tab Bar Controller 展開,點選第二頁的 View Controller
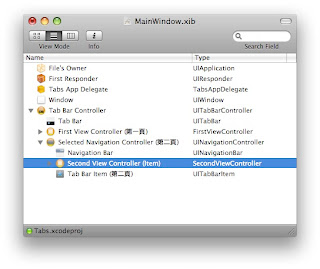
按 +4 把 Class 設為 SecondViewController
按 +1 把 NIB Name 設為 SecondViewController
接著就可以看到 View 的畫面變成這樣
執行看看吧!
第二頁是 Navigation 的 ViewController
如果底下的 Toolbar 不要顯示,可以在 MainWindow.xib 把 Tab Bar Controller 展開,點選 Navigation Controller (第二頁)
按 +1 把 Shows Toolbar 勾選取消即可
很簡單吧!多做幾次就熟悉了,你也可以任意加入其他 UIViewController
==============================
再進階把 SecondViewController 的 UIViewController 換成 UITableViewController:
回到 Xcode 在 Classes 按右鍵 Add \ New File,選 Objective-C Object,Subclass of 選 UITableViewController,取名 MyTableViewController
開啓 MyTableViewController.h 修改如下:
#import
@interface MyTableViewController : UITableViewController {
NSMutableArray *tableData;
}
@property (nonatomic, retain) NSMutableArray *tableData;
@end
開啓 MyTableViewController.m 加上:
@synthesize tableData;
- (void)viewDidLoad {
//[super viewDidLoad];
tableData = [[NSMutableArray alloc] initWithObjects:@"甲", @"乙", @"丙", nil];
}
在 - (UITableViewCell *)tableView:(UITableView *)tableView cellForRowAtIndexPath:(NSIndexPath *)indexPath { 內
的 // Set up the cell... 下面加上
cell.text = [tableData objectAtIndex:indexPath.row];
存檔後回到 IB 新增一個 ThirdView.xib,從 Library 拖曳一個 UITableView 放到 View 的上面排好,點選 File's Owner 在 Class Outlets 加上 Outlet: tableView,Type: UITableView
然後把關係建立如下:
開啓 MainWindow.xib 把 Tab Bar Controller 展開,點選 Second View Controller (Item)
把 Class 換成 MyTableViewController
再把 NIB Name 改成 ThirdView
執行看看,第二頁就變成有 TableView Controller 的畫面:
不錯吧!如果可以跟到這裡,那真的要好好恭喜你!
如果你無法照著我的步驟做到這裡,那真的要好好讀一讀我上一篇介紹的
*2010/10/24補充:


太厲害了, 也很驚訝...小弟初學iPhone XCode, 看再多文章也比不上您這一篇, 感謝... 也給您加油!
回覆刪除有關 UI 一步一步的中文教學真的不多,我寫得也不是很好,請多多指教。
回覆刪除推一下蘋果樹的教學!
回覆刪除我加了TABLE以後都顯示不出資料,照著步驟做了好多次,
都是一樣的結果,不知道是哪個環節出了問題?
蘋果大有這個範例的檔案可供下載嗎?
P.S table cell的 settext在SDK3.0會waring是正常的嗎?
里歐,是不是 cellForRowAtIndexPath 內的這段?
回覆刪除cell.text = [tableData objectAtIndex:indexPath.row];
把 cell.text 改成 cell.textLabel.text 就不會 warning 了。
cell.text 是之前 OS 2.x 的用法,後來 OS 3.x 用 cell.textLabel.text
很受用。
回覆刪除請問可以簡單解釋一下為甚麼要如此建立 table view 的關係?
例如你是怎樣知道要建立 tableView 這outlet的?
Ka Yue,您可以參考在這裡提到的手冊 http://ipdevelop.blogspot.com/2009/05/view-controller-programming-guide-for.html
回覆刪除就會知道 tableview 的關係
請問一下
回覆刪除-(void)tableView:(UITableView *)tableView didSelectRowAtIndexPath:(NSIndexPath *)indexPath{
SearchDataViewController *searchDataViewController = [[SearchDataViewController alloc] initWithNibName:@"SearchDataViewController" bundle:nil];
[self.navigationController pushViewController:searchDataViewController animated:YES];
[searchDataViewController release];
}
其中SearchDataViewController 是另一個繼承UITableViewController的class 可是切換時會發生錯誤。
如果SearchDataViewController改成UITableViewController卻又可以執行~不知是否缺少什麼?
上一個問題似乎解決了
回覆刪除目前發現在切換頁的時候,於viewDidLoad產生的 dataTable資料會被清掉,所以在-(void)tableView:(UITableView *)tableView didSelectRowAtIndexPath:(NSIndexPath *)indexPath 中加了
searchDetailViewController.tableData = [NSArray arrayWithObjects:@"雞排",@"豬血糕",@"烙餅",@"糖村",nil];
就可以了