2013-04-30

Mac Wi-Fi 網路分享

在簡報時,我不會常在電腦旁。所以,不是在講台中央,就是在聽眾群中的走道。

通常,我會使用手機執行 Keynote Remote,這樣就可以一邊走動,一邊控制播放流程。

但是,在沒有 Wi-Fi AP 的環境下,用藍牙又不可以走太遠,所以 Wi-Fi 會是不錯的選擇。

Mac 有分享網路的功能,我來幫你打開,甚至還可以透過 Mac 當成 Wi-Fi AP 讓其他設備上網。
⬆建立 Wi-Fi 網路,不要連接現有的 Wi-Fi AP


⬆網路名稱自己設定,最好也加上 AP 密碼


⬆此時,你的 Wi-Fi 符號會變成這樣

在這個階段,你的 Mac 可以與其他電腦互相連接。


⬆開啟「系統偏好設定」的「共享」


⬆將「Internet 共享」勾選
我這裡是透過區域網路上網,如果你是透過手機分享 3G 網路,那麼「共享連線來源」可以制定為你的 iPhone USB。


⬆這樣就可以分享網路


⬆開啟手機的 Keynote Remote


⬆這樣就可以在手機滑動切換內容


就這樣幾個步驟,你的 Mac 就可以分享給 iPhone、iPad,甚至其他需要 Wi-Fi 連接的電腦或智慧型設備。

.

Apple 的藍牙鍵盤、滑鼠、觸控板


很多人在使用藍牙都有過配對的痛苦經驗,我以前還認為它是失敗的發明。

但是 Apple 的藍牙鍵盤、滑鼠、觸控板,就是簡單到讓你不知不覺地需要它,抽掉了就覺得礙手沒效率。


有趣的是觸控板,一般人都習慣用滑鼠,但是如果願意認真試看看觸控板,反而有沒有滑鼠都不會影響工作效率。
我的觸控板曾經掉到地上,現在還是一直在使用

觸控板最明顯的就是「捲頁」與「定位」。

「捲頁」,雖然有 function/block list 可以讓你點擊很快切換到需要的程式行位置,但是搭配觸控板的「慣性捲動」只要手指輕輕一撥就好,捲動的速度連 PageUp/PageDn 都趕不上。
「定位」,是在設計時非常重要的技巧,就算你用個 dpi 很高、反射率很精密的滑鼠墊,體驗了觸控板會很訝異,為什麼這麼粗的手指頭可以這樣細微地將鼠標定位到我要的位置?!


但是以上如果手指容易出汗、潮濕,那麼觸控板就完全廢物了。
.

2013-04-26

Delphi 寫的程式 Build 到 Mac OS X 執行


為什麼這樣做?

說真的,用了 Object Pascal 那麼多年,還是用 Delphi 開發 Windows 的程式比較習慣。

這也是為什麼,目前商用軟體的廠商,還是採用 Delphi 開發系統應用程式佔了大多數的原因。

我為了這個目標,大概用了幾年的時間,想要在 Mac 上面開發商用軟體,試了很多種做法,現在 Delphi 可以用 LLVM 編譯,再傳到 Mac 上面,我看這樣的路會是最無痛,也是比較實際的方法了!

Borland(embarcadero) Delphi 這次不會像兩千年的 Kylix 了,挑對了作業系統,命運也會朝向好運的方向前進!

辦公室的軟體,移植到 Mac OS 的時間應該不遠了!


.

2013-04-19

UIImage 存放到 NSArray/NSMutableArray 內

最近學員遇到一個問題,要將 UIImage 放到 NSMutableArray 內,但是很不幸地會發生這樣的錯誤訊息:
ImageArray[5343:c07] *** Terminating app due to uncaught exception 'NSInvalidArgumentException', reason: '*** -[__NSArrayM insertObject:atIndex:]: object cannot be nil'

不管是從 NSBundle 或是從 NSFileManager 取得 Documents 的都一樣。

載入如下:

NSArray *directoryContent = [[NSBundle mainBundle] pathsForResourcesOfType:@"png" inDirectory:nil];
NSMutableArray *items = [[NSMutableArray alloc] initWithCapacity:0];

for (NSString *imagePath in directoryContent) {
    UIImage *img = [UIImage imageNamed:imagePath];
    [items addObject:img];
}
NSLog(@"imagesArray:%@", items);

可是執行之後,就會得到上述的錯誤訊息。

錯誤的原因就在這句:
UIImage *img=[UIImage imageNamed: imagePath];

只要改成
UIImage *img = [UIImage imageWithContentsOfFile:imagePath];

錯誤就可以修正


最後正確的程式碼如下:

NSArray *directoryContent = [[NSBundle mainBundlepathsForResourcesOfType:@"png" inDirectory:nil];
NSMutableArray *items = [[NSMutableArray allocinitWithCapacity:0];

for (NSString *imagePath in directoryContent) {
    UIImage *img = [UIImage imageWithContentsOfFile:imagePath];
    [items addObject:img];
}
NSLog(@"imagesArray:%@", items);


善用你在 Xcode 的 Option+Click,你就可以找到答案了:

+ (UIImage *)imageWithContentsOfFile:(NSString *)path
Creates and returns an image object by loading the image data from the file at the specified path.
This method does not cache the image object.

+ (UIImage *)imageNamed:(NSString *)name
Returns the image object associated with the specified filename.
This method looks in the system caches for an image object with the specified name and returns that object if it exists


下載範例檔案
.

2013-04-01

Storyboard 有兩個 Segue 的問題

剛好有學員問到這樣的問題,我就拿該程式畫面在這裡做個圖文解說。
這個畫面連結了兩個 Segue
一般 Segue 都是要在  - (void)prepareForSegue:(UIStoryboardSegue *)segue sender:(id)sender 內安排,如果有 Object 或 Value 要往下個 ViewController 傳遞的話,也是在這裡處理。


另外,如果只有一個 Segue 是從 UIButton 發生,可以這樣做:
- (IBAction)btnSyp:(id)sender {
    UIStoryboard *storyboard = [UIStoryboard storyboardWithName:@"MainStoryboard" bundle:nil];
    Game01VC *vc = [storyboard instantiateViewControllerWithIdentifier:@"CustomerAdd"];
    vc.Flag = 1;
}

但是,第二個 UIButton 就無法如預期發生。
- (IBAction)btnKiller:(id)sender {
    UIStoryboard *storyboard = [UIStoryboard storyboardWithName:@"MainStoryboard" bundle:nil];
    Game01VC *vc = [storyboard instantiateViewControllerWithIdentifier:@"CustomerAdd"];

    vc.Flag = 2;
}

所以,還是要回來以 prepareForSegue 處理。


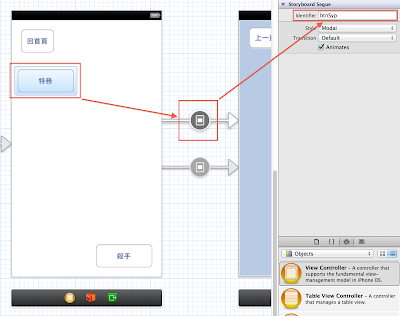
先在 Storyboard 內設定好 Segue 的 Identifier 為 @"btnSyp" 與 @"btnKiller"


在第一個 UIButton 連結的 Segue 設定 Identifier 為 @"btnSyp"
另一個 UIButton 連結的 Segue 設定 Identifier 為 @"btnKiller"

在 prepareForSegue 內的程式如下:

-(void)prepareForSegue:(UIStoryboardSegue *)segue sender:(id)sender
{
    Game01VC *vc = segue.destinationViewController;

// 原本在 -(IBAction)btnSyp:(id)sender 內的,移到這裡來,以這種方式做
    if ([segue.identifier isEqualToString:@"btnSyp"]) {
        vc.Flag = 1;
    }
    
// 原本在 -(IBAction)btnKiller:(id)sender 內的,移到這裡來,以這種方式做
    if ([segue.identifier isEqualToString:@"btnKiller"]) {
        vc.Flag = 2;
    }
}

如此,就可以讓下個 ViewController 收到 Object 或 Value 了。


.